
How to Pressure Test Your Plumbing DIY
How to Pressure Test Your Plumbing DIY: If you’re renovating, building, or just troubleshooting water leaks, one of the most effective ways to ensure your pipes are sealed tight is through a plumbing pressure test. And yes, you can do it yourself — with the right tools, safety precautions, and guidance.
At ASKA Solution, we offer professional plumbing services across Saudi Arabia, but we’re also here to empower property owners with expert advice. Here’s how you can conduct a DIY plumbing pressure test like a pro.
Table of contents
Details About How to Pressure Test Your Plumbing DIY
What Is a Plumbing Pressure Test?
A plumbing pressure test is a method used to verify if your plumbing system is holding water (or air) without any leaks. This is commonly done before a system is turned on for regular use, especially in new construction or after repairs.
Read Also: The Best Vacuum Pump Repair and Service in Saudi Arabia
What You’ll Need:
- Pressure gauge (0–100 PSI)
- Pressure test pump (manual or air)
- Pipe plugs or caps
- Teflon tape or thread sealant
- Adjustable wrench
- Safety goggles and gloves
- Access to water (if using a water test)

Types of Pressure Testing Methods:
- Water Pressure Test (Hydrostatic Test) – Best for home plumbing systems
- Air Pressure Test (Pneumatic Test) – Used in areas where water could cause damage
Tip: For most residential and commercial systems, a water pressure test is the preferred method.
Step-by-Step: How to Pressure Test Your Plumbing DIY
Step 1: Turn Off the Main Water Supply
Shut off the water to prevent unwanted pressure or flow during the test. If possible, isolate the area you want to test.
Step 2: Cap or Plug All Openings
Use plugs or caps to seal any faucets, hose bibs, or fixtures connected to the system you’re testing. Make sure all connections are watertight using Teflon tape.
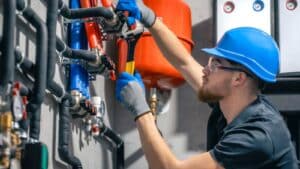
Step 3: Attach the Pressure Gauge and Pump
- Connect the pressure gauge to a convenient test port or fixture.
- Hook up your manual test pump or air compressor (for air tests).
Step 4: Build Pressure Slowly
Pump up the pressure slowly until it reaches 1.5 times the normal operating pressure.
For residential plumbing, this usually means around 60–80 PSI.
Never exceed 100 PSI, especially in older pipe systems.
Step 5: Monitor Pressure for 15–30 Minutes
Once the pressure is set, stop pumping and watch the gauge.
- A stable gauge means no leaks.
- A drop in pressure suggests there’s a leak somewhere in the system.
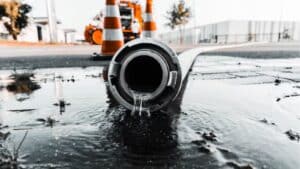
Step 6: Inspect for Leaks
Look for any signs of:
- Drips or pooling water
- Hissing sounds (in air tests)
- Wet joints or loose fittings
Fix any leaks and repeat the test if needed.
Safety Tips
- Never use air pressure on plastic pipes like PVC or PEX at high pressure — it can cause bursting.
- Always wear eye protection and gloves.
- Avoid testing near live electrical wires or outlets.
When to Call a Professional
While a DIY pressure test is possible, call ASKA Solution if:
- You’re unsure about pipe materials or system layout
- You’re working on a high-rise or commercial property
- The system involves gas lines, fire suppression, or water tanks
- You need official documentation or certification
Our licensed plumbers in Saudi Arabia provide certified plumbing pressure testing and leak detection services across Dammam, Riyadh, Jeddah, and beyond.

Why Choose ASKA Solution?
- Licensed and insured plumbers
- Certified pressure testing for residential and industrial buildings
- Emergency leak detection and repair
- Service across the Kingdom of Saudi Arabia


Add comment
You must be logged in to post a comment.